
Service
Wählen Sie Speicher > Gesamt, um eine Übersicht über alle geleisteten Trainingsdaten auf dem Gerät anzuzeigen.
Hier erhalten Sie:
› Gesamtkilometer
› Gesamtzeit
› Gesamt Höhenmeter bergauf
Die Gesamtwerte können Sie z.B. nach einem zurücksetzen der Gerätefirmware auch über die SIGMA RIDE App wieder einstellen.
-
SIGMA RIDE App
Mit der Link App können Sie eine umfangreiche Auswertung Ihrer Trainingsdaten durchführen. Für jede Trainingseinheit bekommen Sie verschiedene
Trainingsparameter, Grafiken etc. angezeigt. Zudem können Sie direkt aus der SIGMA RIDE App Ihre Trainingsdaten in Drittportale exportieren. Welche
Portale hierzu verfügbar sind, entnehmen Sie bitte dem Sharing Menü der App. Um vergangene Trainingseinheiten zu betrachten, wechseln Sie in die
Aktivitätenliste und wählen Sie die entsprechende Einheit aus. -
SIGMA DATA CENTER
Im SIGMA DATA CENTER haben Sie noch tiefgreifendere Analysemöglichkeiten Ihrer Trainingsdaten. Neben den Funktionen in der SIGMA RIDE App können
Sie hier noch tiefer in die Daten eintauchen sowie die Daten in weiteren Formaten (z.B. .csv) exportieren. Im DATA CENTER haben Sie zusätzlich noch
detailliertere Möglichkeiten, um einen Track zu planen. -
Drittanbieter
Die Trainingsdaten des ROX 2.0 liegen als .FIT Datei vor. Daher können sämtliche Portale, die diesen Standard verwenden die Daten des ROX 2.0 lesen.
Den Export zu entsprechenden Drittanbietern können Sie über die SIGMA RIDE App durchführen. Ist das gewünschte Portal hier nicht für eine
automatische Synchronisation verfügbar, haben Sie zudem die Möglichkeit die .FIT Dateien auch direkt zum Drittanbieter hochzuladen. Hierzu müssen Sie den ROX 2.0 via USB-C Kabel mit dem PC verbinden. Die Trainingsdaten finden Sie dann im Ordner Activities.
Des Weiteren kann der ROX 2.0 auch z.B. Workoutdaten von Drittanbietern wie Trainingpeaks verarbeiten. Der Import, von Workouts, Tracks etc. erfolgt dabei immer über die SIGMA RIDE App.
Der SIGMA Performance Index, kurz SPI bietet Ihnen eine objektive Bewertung der Trainingsleistung an. Diesen Wert finden Sie für jede Trainingseinheit
innerhalb der SIGMA RIDE App.
Der Wert setzt sich aus 3 verschiedenen Variablen zusammen:
› Die geleisteten Höhenmeter bergauf (diese werden für den ROX 2.0 bei eingeschaltetem GPS von der App nachberechnet)
› Die Gesamtdistanz des Trainings
› Die Durchschnittsgeschwindigkeit
Steigen diese Werte, wird auch der SPI größer.
Betrachten Sie ihre SPI Werte im Zeitverlauf können Sie eine klare Leistungssteigerung, -stagnation oder -verschlechterung erkennen.
Der SPI betrachtet dabei keinerlei individuelle Daten wie Herzfrequenz oder Leistung. Der Wert wird ohne Einheit angegeben und kann werte zwischen 1 und 9999 annehmen, wobei die meisten Werte im Bereich von 1-600 liegen.
Anhand dieser Beispiele bekommen Sie ein Gefühl für den SPI:
Um die Firmware des Geräts zu aktualisieren haben Sie folgende Möglichkeiten:
› Verwendung der SIGMA RIDE App
› Verwendung des SIGMA DATA CENTER
Ob ein neues Update für Ihr Gerät verfügbar ist, erfahren Sie, wenn Sie das Gerät mit der SIGMA RIDE App verbinden. Gibt es neue Firmware, erhalten Sie eine Meldung in der App und können diese dann entsprechend auf den ROX 2.0 übertragen.
Verwenden Sie das DATA CENTER für eine schnellere Übertragung des Updates. Dort werden Sie ebenfalls auf eine aktualisierte Firmware hingwiesen,
wenn Sie den ROX 2.0 mit dem DATA CENTER verbinden.
Ist das Update auf den ROX 2.0 übertragen, erhalten Sie auf dem ROX 2.0 eine Meldung. Bestätigen Sie diese, wenn Sie das Update jetzt installieren
möchten. Nach der Installation bleiben Ihre Einstellungen erhalten.
-
Spezifikationen
__TODO: table__
-
Reinigung des Geräts
Wir empfehlen den ROX 2.0 in regelmäßigen Abständen und bei stärkeren Verschmutzungen zu reinigen. Verwenden Sie dazu bitte nur milde
Reinigungsmittel. Um eine optimale Funktion z.B. des Höhensensors zu gewährleisten, ist eine regelmäßige Reinigung der Geräts notwendig. Um den
Höhensensor zu reinigen, legen Sie den ROX 2.0 besten für einige Minuten in klares Wasser ein und spülen Sie danach das Gerät nochmals unter fließendem Wasser ab. Bei starker Verschmutzung kann es sein, dass Dreck die Tasten blockiert. In diesem Fall folgen Sie bitte der gleichen Anweisung wie für die Reinigung des Höhensensors. -
EU-Konformitätserklärung
Wir, SIGMA-ELEKTRO GmbH, Dr.-Julius-Leber-Str. 15, D-67433 Neustadt/Weinstraße erklären, dass der Fahrradcomputer ROX 2.0 und die Sender SPEED, CADENCE und R2 Duo bei bestimmungsgemäßer Verwendung den grundlegenden Anforderungen gemäß RED Directive 2014/53/EU und der RoHS Directive 2011/65/EU entsprechen.
Die CE Erklärung finden Sie unter: ce.sigmasport.com/rox20 -
Garantiebedingungen
Wir haften gegenüber unserem jeweiligen Vertragspartner für Mängel nach den gesetzlichen Vorschriften. Batterien sind von der Gewährleistung
ausgenommen. Im Falle der Gewährleistung wenden Sie sich bitte an den Händler, bei dem Sie Ihren Fahrrad Computer gekauft haben. Sie können den Fahrrad Computer mit Ihrem Kaufbeleg und allen Zubehörteilen auch an die nachfolgende Adresse senden. Bitte achten Sie dabei auf ausreichende
Frankierung.
SIGMA-ELEKTRO GmbH
Dr.-Julius-Leber-Straße 15
D-67433 Neustadt/Weinstraße
Service-Tel. +49-(0)6321-9120-140
E-Mail: kundenservice@sigmasport.com
Bei berechtigten Ansprüchen auf Gewährleistung erhalten Sie ein Austauschgerät. Es besteht nur Anspruch auf das zu diesem Zeitpunkt aktuelle Modell. Der Hersteller behält sich technische Änderungen vor. -
Entsorgung
Batterien dürfen nicht im Hausmüll entsorgt werden (Batteriegesetz – BattG)!
Bitte geben Sie die Batterien an einer benannten Übergabestelle oder im Handel zur Entsorgung ab.
Elektronische Geräte dürfen nicht im Hausmüll entsorgt werden.
Bitte geben Sie das Gerät an einer benannten Entsorungsstelle oder im Handel ab.
Vor der Entsorgung müssen alle personenrelevanten Daten vom Gerät gelöscht werden.
-
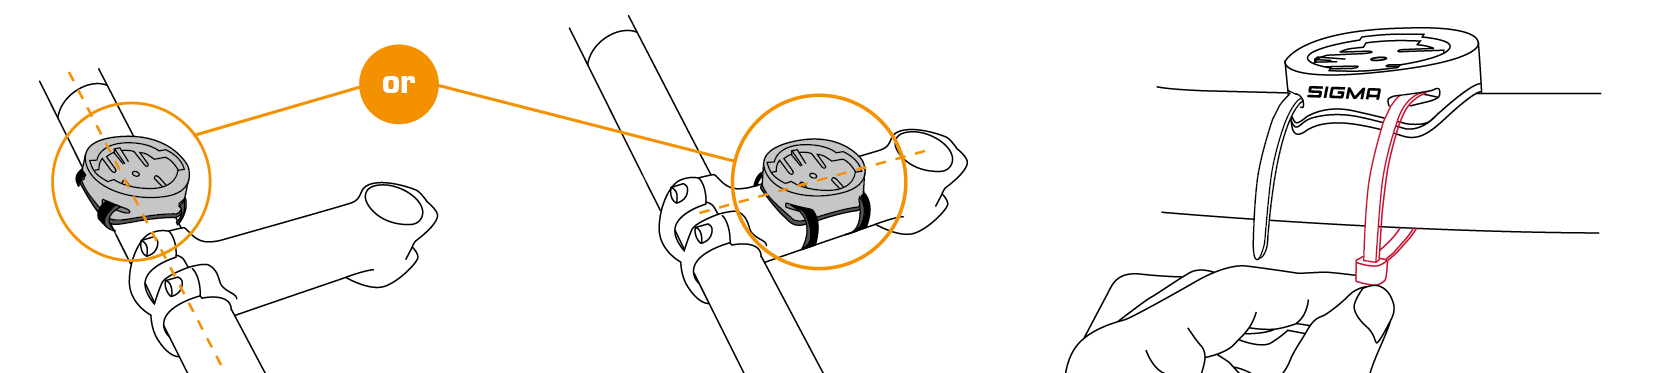
GPS Mount
-
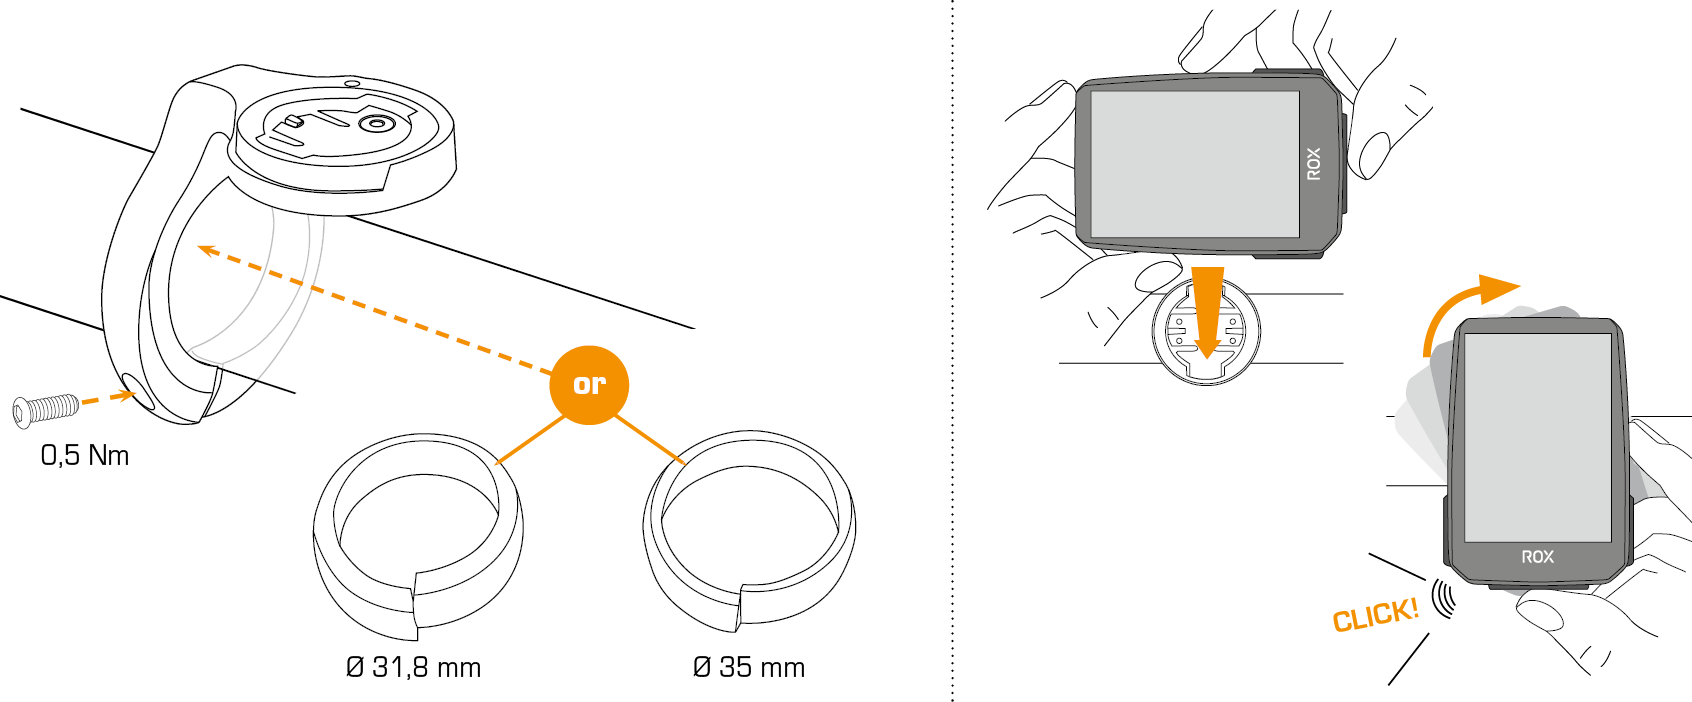
Overclamp Butler
-
Speed / cadence transmitter FIRST START
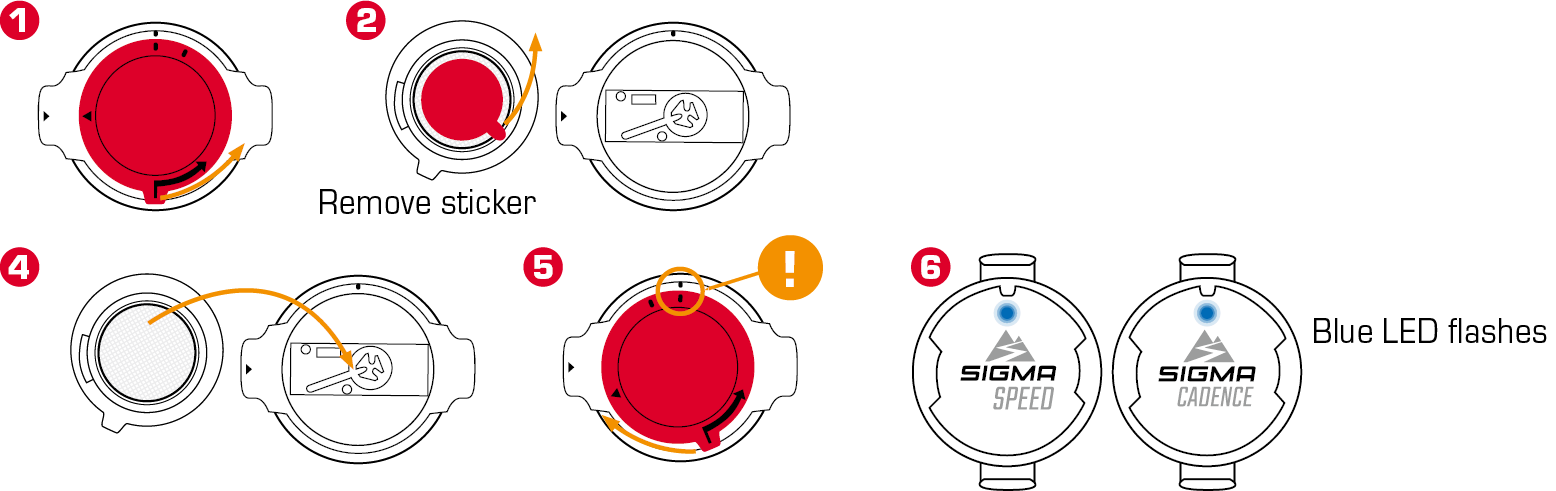
-
Speed transmitter
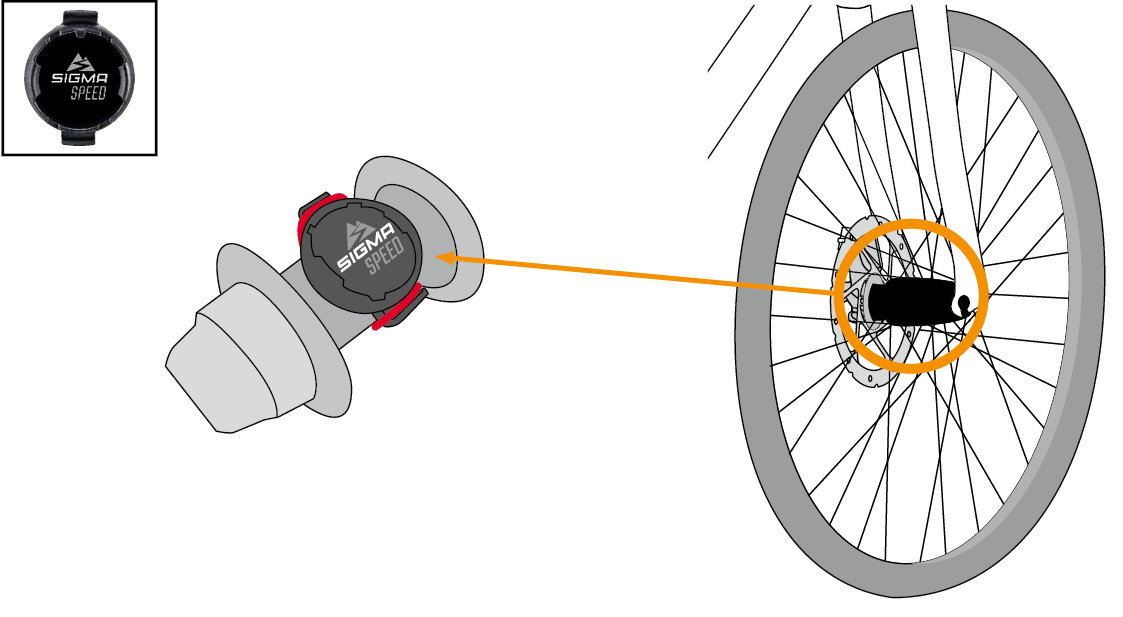
The SPEED-Sensor can be mounted on the bicycle hub of both wheels.
-
Cadence transmitter
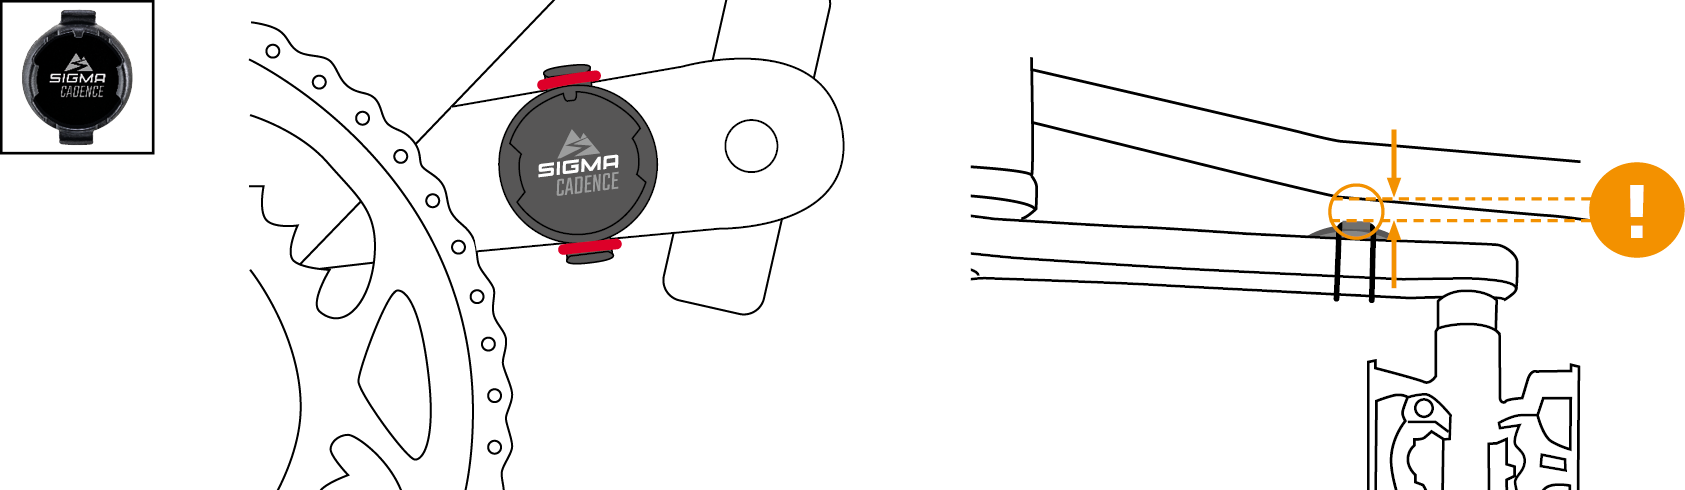
-
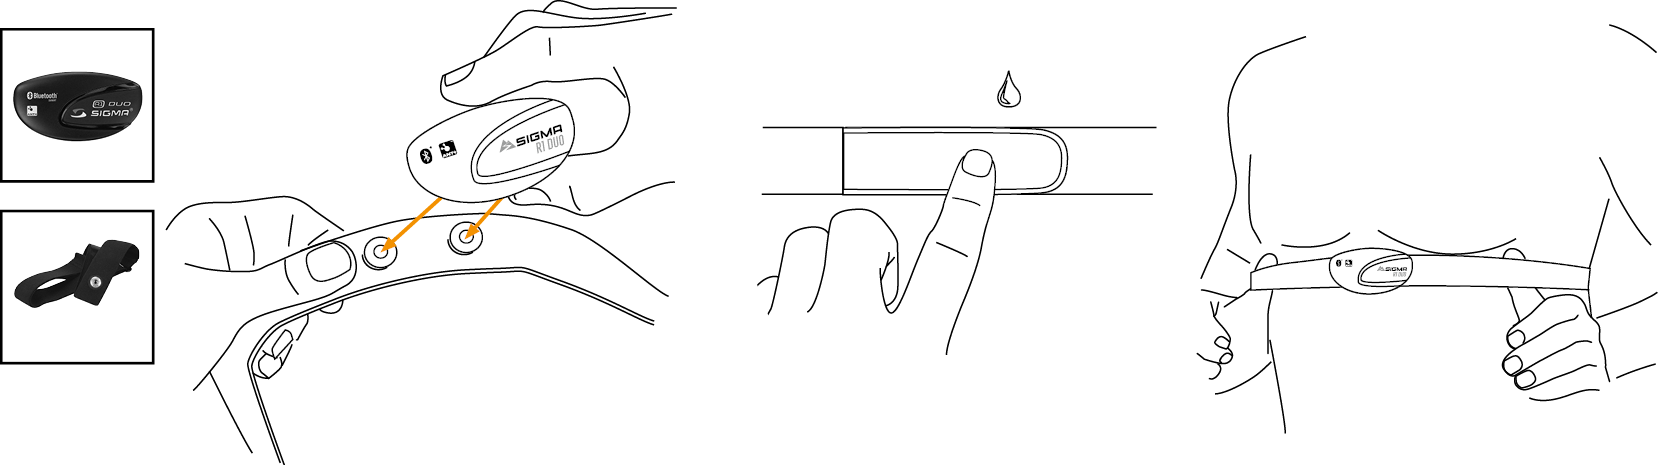
Heart rate transmitter
If you want to use the device for the first time, hold down the START / Menu ![]() button for 5 seconds. This will take you to the wake up menu in which you can make all important settings.
button for 5 seconds. This will take you to the wake up menu in which you can make all important settings.
You have 2 options for this:
1. Connect the smartphone and set the ROX 4.0 with the SIGMA RIDE app ![]()
2. Make the settings manually on the ROX 4.0 ![]()
To connect the smartphone, please follow the instructions in the chapter Connecting a smartphone. To adjust a setting manually, select the desired value with the + or – button and confirm this by pressing the START button.
At the end of the setting you have the option of connecting sensors such as a heart rate chest strap, please follow the instructions in the chapter Connecting the sensor.
When all settings have been made, you can use the device. To assemble the device, please follow the steps in the chapter Assembly.
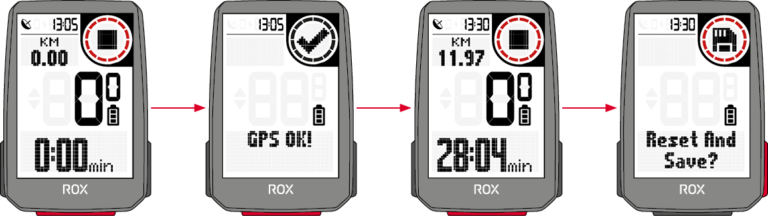
Every time you switch on the device, the ROX 4.0 starts in the training screen to enable you to start training as quickly as possible. To switch the device on, press and hold the START button for 3 seconds.
The ROX 4.0 starts searching for GPS satellites immediately after being switched on.
-
GPS Fix
To enable the ROX 4.0 to be connected to GPS / GLONASS as quickly as possible, please follow these instructions:
› Find a field that is as open as possible (no trees, houses, etc. that interfere with reception)
› If possible, do not move until you have received the message GPS OK or the GPS icon no longer flashes
› Synchronize the ROX 4.0 as regularly as possible with the SIGMA RIDE app so that the most current GPS data is always available on the device -
Training process
If you want to use GPS, wait until the message GPS OK. Then press the START button once to start the training.
If no data recorded, the training is either in auto pause or stopped. In this case you can see the training status in the display (circle element).If you have not yet started the training but are moving at more than 2.2 km / h, you will receive a recurring request to start the training. Data is only recorded when it has been started.
At any time during the training you can change the training views for the current sport profile, use the SIGMA RIDE app and follow the instructions in the chapter Setting training views.
If you would like to calibrate other settings during the training, such as auto pause, tones or the altitude, keep the START button pressed to access the quick menu.If you want to end the training, press the START button once. You can now start the training again by pressing the START button, or you can leave the training and save the training session.
To do this, hold down the ”+” key. “ -
Saving and evaluating the training
The training data is synchronized with the SIGMA RIDE app after the training. You can also synchronize the training data with the PC and the SIGMA DATA CENTER via a USB connection.
You also have the option of synchronizing the data with the SIGMA RIDE app in third-party portals. Instructions for this can be found in the chapter Synchronizing training data with third-party software.
On the device you will also find an overview of the total values performed. To do this, open the main menu and select the area
Storage ›Totals.
-
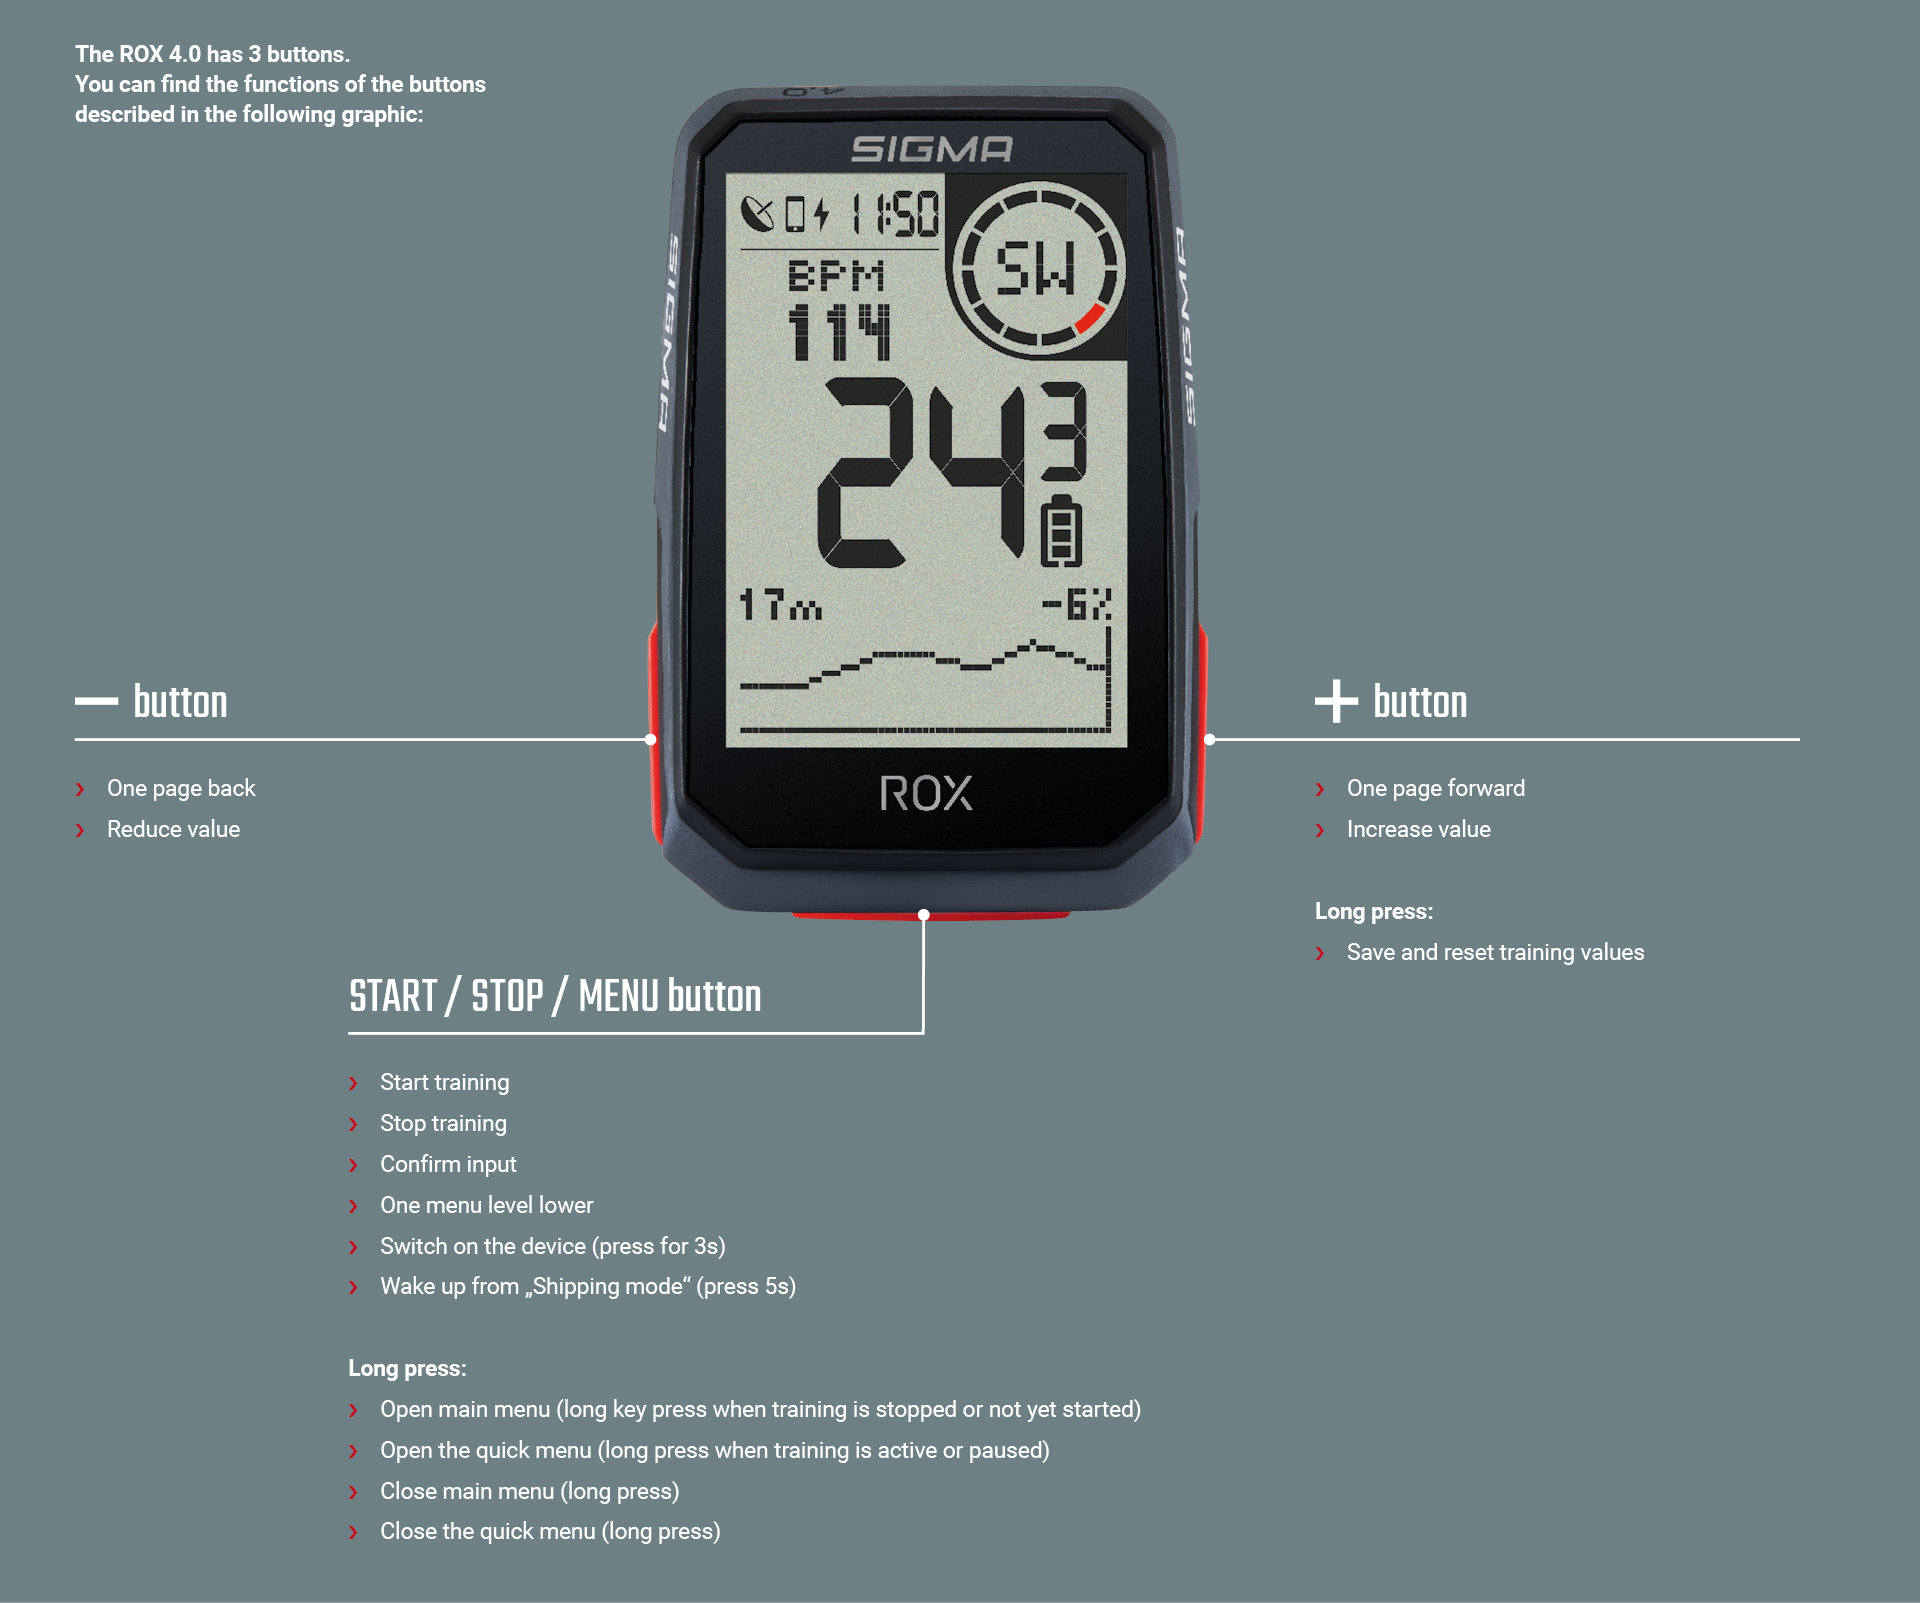
The ROX 4 has 2 different menus, both of which can be called up by long pressing the START button. In the menus you will always find the option Back as the last item.
This will leave you with the current one and return to a higher menu level.Main menu:
You can reach the main menu if the training has not yet started or is in a stopped state (ATTENTION not AUTOPAUSE).
Via the main menu you can access all available settings as well as a smartphone or external sensors for the first time.Quick menu:

You can access the quick menu when the training has started or is in AutoPause. In the quick menu you only have access to the most important training functions and settings.
While exercising, press and hold the START button to open the quick menu. -
Charging and battery life
The ROX 4.0 has a standard USB-C connection. You can charge the ROX 4.0 at any USB port that meets the following specifications:
Voltage: 5V
Charge current at least: 1000mA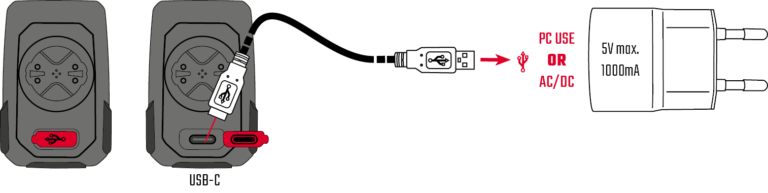
The ROX 4.0 can also be charged while driving, e.g. if you connect a power bank to the device.

Depending on the charger used, the charging time is approx. 2.5 – 3 hours. During the charging process, you can see the current charge status on the display.
Depending on how the device is used, the battery life will vary. The usual running times can be found in the following table:
Please note: The scenarios shown are sample values. They serve as a guide to the expected running times of the ROX 4.0 and provide you with guidance on how to extend battery life. -
Communication with external sensors
The ROX 4.0 can connect to external sensors using two different radio protocols: Bluetooth Low Energy (BLE) and ANT +. Please note that many sensors offer both protocols.
In that case you only have to connect ONE of the two channels to receive the data from the sensor. We recommend using the ANT + channel here.The following sensors can be connected:
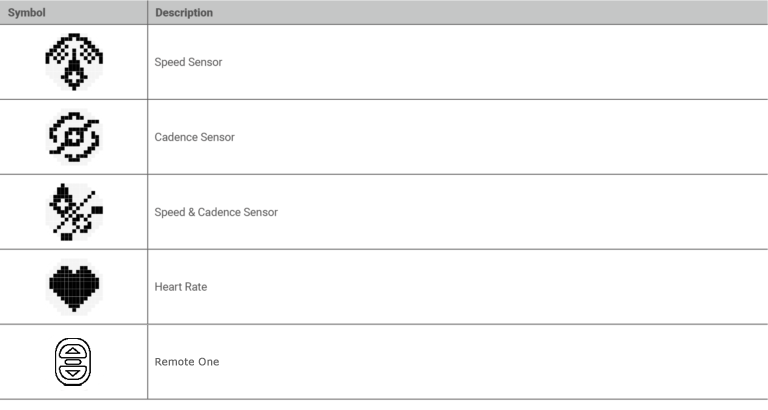
BLE / ANT +:
› Speed sensor
› Cadence sensor
› Combo sensors for speed and cadence
› Heart rate sensors (e.g. chest strap)Please refer to the sensor manufacturer’s operating instructions to find out whether your sensors support the protocols mentioned. How to establish the connection can be found in the chapter
Setting the connection to external sensors. If the sensor has been found by the ROX 4.0, you will receive a short message about the successful connection.
Basically, you have different options to adjust the settings of the ROX 4.0 according to your wishes. You can do this either directly on the device or with the SIGMA RIDE app.
-
Change settings on the device
This chapter describes the settings that you can set in the main menu. If you have already started the training, you only have a selection of setting options in the quick menu.
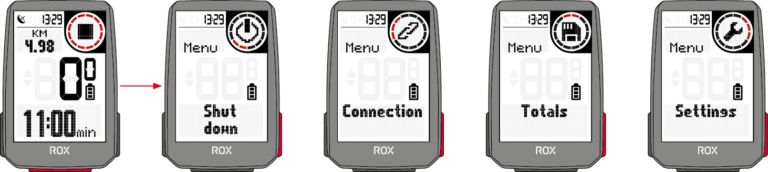
You will find the following options for setting the device in the Settings menu:
› Shut Down: Here you can switch off the device.
› Connection: Here you can set up connections to external sensors, a smartphone, eBIKE or Komoot
› Total values: Here you will find an overview of your total values, such as distance, altitude, etc.
› Settings: Here you will find all device settingsThe functionality of the 4.0 is congruent in all settings. Use the + or – button to select the menu item to be set, with START confirm the selection.
Then you can make the setting with the + or Minus button and confirm again with START. You can close the menu at any time by holding down the START button.
-
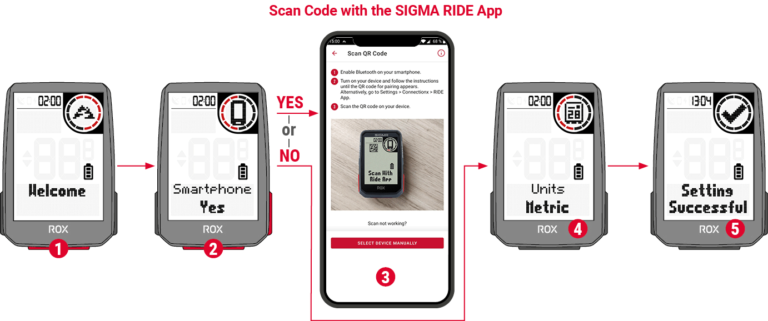
Connection to the smartphone
To establish the connection to the smartphone, make sure that Bluetooth is switched on on your smartphone. You have to download the SIGMA RIDE app from the respective app store (iOS or Android). If these two requirements are met, select the menu item Connections> Smartphone. The ROX 4.0 displays a QR code that can be scanned with the SIGMA RIDE app. For the rest of the process, please follow the instructions in the SIGMA RIDE app.
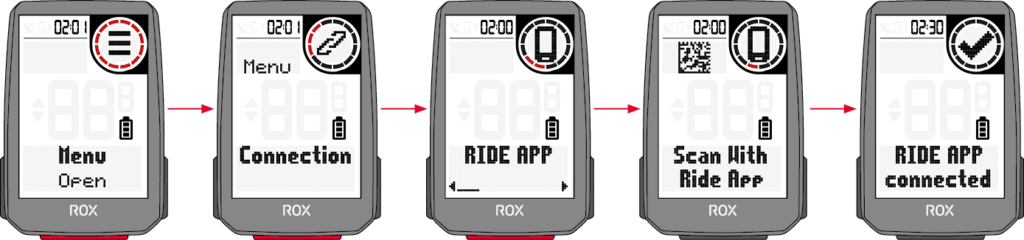
The SIGMA RIDE app will guide you according to various authorizations, among others. Ask for location approval. Agree to these authorization requests in order to ensure optimal functionality of the SIGMA RIDE App.
If you have successfully connected the smartphone, you can see in the menu item Smartphone which smartphone was connected to the device and cancel the pairing to the smartphone. Please note that the
ROX 4.0 can only communicate with ONE smartphone. -
Connection to external sensors
To establish a connection with a sensor, the sensor must be within radio range (a maximum of approx. 10 m away). In addition, the sensor must be activated or switched on.
How to mount the supplied sensors (only available in the SET or as an accessory) is described in the chapter Assembly.
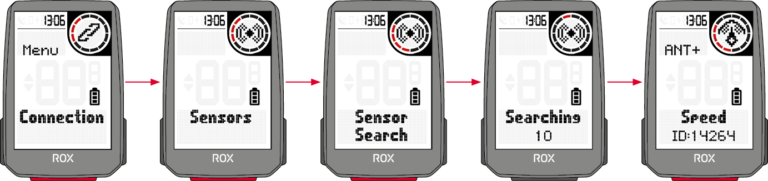
If you have not yet connected any sensors, select the menu item Sensors and Search for new sensors. The ROX 4.0 then searches for all available sensors. If sensors are found, a list with all newly
found sensors appears. Navigate through the list with +/- and select the desired sensor. For ANT + sensors you will see the sensor ID in the list, for BLE sensors the name of the sensor appears.The following symbols stand for the different sensor types:
To pair a sensor with the ROX 4.0, select the sensor in the list and press the START button. The pairing starts immediately and you will receive a message about the status of the pairing. If an error message is displayed, please check the requirements described again.
If you have already connected sensors, you can add new sensors as well as view and manage the existing sensors by selecting Connection > Sensors.
In the list of connected sensors you can also see the battery status of the sensor. If you want to disconnect the sensor, press the START button and follow the instructions on the display.
During training, you will receive a short message when a sensor has been connected or the connection to a sensor is lost. If a sensor is not found, the ”- -” symbol appears after 5 minutes instead of the value (e.g. cadence). Then please check whether the sensor is within range and switched on. If you would like to connect a sensor to the device at a later point in time, open the quick menu by pressing START for a long time (in the started training). Then select Search sensors. The ROX 4.0 then briefly disconnects all connections and reconnects the sensors.
In order to be able to view the data from the sensors during training, remember to adapt the training views accordingly.
-
E-Bike
To connect an e-bike to the ROX 4.0, select the E-bike menu item in the connection settings. If there is currently no e-bike paired with the ROX 4.0, the ROX 4.0 immediately searches for available e-bikes.
Whether your e-bike is compatible with the ROX 4.0, please refer to the following list: Link to the compatibility listFor pairing, the e-bike must be nearby (maximum approx. 10 m away) and switched on. Please refer to the operating instructions for your e-bike to find out whether further steps are required on
the e-bike side to connect the e-bike to a display.Only ONE e-bike can be connected to the ROX 4.0 at a time.
If compatible e-bikes are found, a list of the e-bikes found is displayed after the search. Select the desired e-bike (+/- button) and start pairing with the START button.
If the pairing is successful, you will be taken to the information view of the e-bike. You can also reach this when you select the menu item with a paired e-bike
Select E-Bike in the connection settings. Here you can see various information about the e-bike and can disconnect the connection between the ROX 4.0 and the e-bike.
To do this, press the START button in the e-bike overview.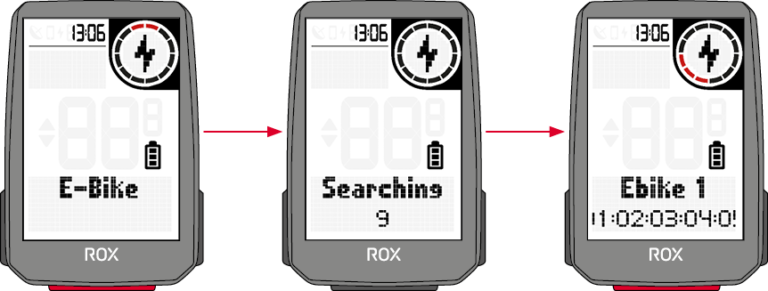
Um die Einstellungen Ihres Gerätes zu verändern, wählen sie in den Einstellungen den Menüpunkt Gerät aus. Die Einstellungen sind in der folgenden
Tabelle beschrieben: